Further Adventures
in Laptop Repair
Hey, y'all. About six or seven months back I wrote an article about how I fixed my broken laptop all by my little lonesome self. Well, some stuff has happened since then so I thought I'd just give all y'all a quick little update. Like at the end of Unsolved Mysteries. I suggest you go read that article before you read this one.
You're back? Okay. The original repair I made to my Compaq Presario 1200 series (1247 to be exact) laptop was very tenuous to say the least. Kind of Nick Nolte's like grasp on reality. You couldn't really touch the machine when it was plugged in or else it might knock Linda Joe out of whack, and that would be as whack as tobacco if you're a teen. Yo. I eventually did open Raichu back up in order to fix the floppy drive. But soon enough Linda Joe got knocked around a little bit too much and came undone again. So out came the toolkit, and out came the screws, and back in place went Linda Joe.
Over the course of the next several months I did this I think a total of five times. Each time I would have like one or two more screws left over, but Raichu seemed to be as sturdy as ever so I don't think you need all the screws that it starts with. Or at least I hope not. The really interesting thing is that I started to get emails from people who were trying to open up their Presario 1200 series laptops as well, and wanted more information about how I did it. Curious, I went to google and typed in "Presario 1200 laptop repair." It turns out that my article is within the first ten results! It's like number seven or something! May I just say kick ass? Kick ass!
Anyway. So I'm here to explain a little bit more in detail just how I got the durned thing open.
The first step is to take all the screws out of the bottom. These are basically the only ones you can see at first, so this is the easiest of baby steps to take to be on your way to the glorious world of home laptop repair. But it isn't the most important part. Oh, no. Luke's leaving Tatooine was important, yes, but it was his learning of the force that allowed him to destroy the Death Star. The learning of the force in repairing a laptop? Finding the hidden screws. Yes, there are screws that are holding the monitor to the body of the laptop. They're hidden underneath the hinges, which are in turn hidden under these little pieces of black plastic.
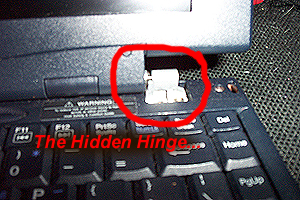
Hinge Covers! Clever. Maybe... too clever. You have to take these things off in order to get at the screws underneath. Unfortunately I couldn't figure out how to get them off without completely breaking them. And you only get two tries. So now Raichu has some exposed metal hinges. Thankfully it doesn't care about its appearances, but if you're taking your laptop to some high-powered corporate meeting, you might want to be a little bit more careful than I was.
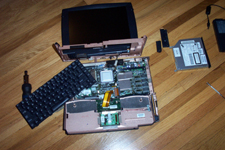
There are a couple screws on each hinge, and once they're gone you can just lift the monitor off the body. Be careful, though, becuase it's still plugged into the body. But now you can take off the front panel (where the touch pad and speakers are) and the keyboard. Once the keyboard is off, you'll see a big metal plate.
Under that metal plate are the guts of your laptop, where everything plugs in. You should probably somehow keep track of where everything plugs in so you can safely unplug what you need to and still be able to put it back if you want to. In order to get at some of the stuff you still have to hunt around the plastic skeletal frame for more screws to dislodge.
Anyway. So I'd done this about five times or so, each time putting Linda Joe carefully but precariously back in place. But she kept on falling over the edge! So the last time I was determined to keep her there. Put that woman back in her place, barefoot and preggers! So here's what I finally figured out: Linda Joe lives in this small confined space that's all right angles, but she has some space all around her. If I could jam something in that space, surround her with something, then she wouldn't get dislodged so easily! Yes! There is no off position on the genius switch!
What I finally found that actually worked was an art eraser. Yup. An eraser. One of those soft, white ones. I just tore it to exact specifications and jammed it in the spaces surrounding Linda Joe. Then I sealed Raichu back up (with a couple extra screws, of coures) and that was, as they say in the business, "that."
That's all. Just a little quickie article. Hope it helps anyone who is having trouble. I haven't had any problems with my laptop now at all since I used that art eraser to hold Lindo Joe in place. The only problem I have now is that Carrie is so totally addicted to computer solitaire, even more than Andy Dick on News Radio. So I haven't actually been getting much writing done on it because every time I turn around I see Carrie putting a red jack on a black queen. Also every time I turn around I see the girl that turns my world around, standing there. Every time I turn around.
| Related Articles: | |
| Related Links: |